Tuesday, May 26, 2020

It Starts with a Gift: A Wood and Fiber Collaboration

 It Starts with a Gift:  A Wood and Fiber Collaboration


I have collaborated with Olena Nebuchadnezzar on three pieces.  Olena is a fiber artist.  I am a woodworker.  So, how does such collaboration come about?  What does it look like?  What is its impact?

This collaboration starts with the heart: A gift for a dear friend.  My friend is a quilter and I decided to incorporate an allusion to quilting into a small stool/ table.  I contemplated a variety of possibilities  incuding marquetry, “sewn” wood patches, and, finally, incorporating actual quilts.  I can’t quilt; I can’t even sew!  While puzzling over who might do the quilts, I remembered going to the Blue Spiral Gallery in Asheville so my friend could show me the work of one of her favorite quilters:  Olena Nebuchadnezzar.  When I first saw Olena’s work I was overwhelmed with its beauty, attention to detail, vivid colors and nature themes.  But would she collaborate with me? 

Her positive response to an email outlining my tentative plan surprised and delighted me.  What ensued was a series of emails in which we exchanged sketches of the piece from me and sketches of the panel from Olena.  Olena’s usual focus is nature; and my friend’s husband, also a dear friend, is a birder.  So, we settled on birds.  Finally, when the woodworking was complete,  I sent fitted plywood panels to Olena and she returned them to me with the quilts mounted  on them. 

We have collaborated on three pieces .  And each unfolded just like the first piece:  An agreement to work together, an exchange of ideas and sketches, completion of the woodwork , completion of the quilted panels.  We have never met in person nor have we even talked on the telephone.

The Gift  a small table (12” Depth x17.5” Width x 24” Height) has a Japanese

sensibility in the overall shape and many of the details.  The color, texture and detail in the mini quilts immediately draw one’s eye.  The medium light color of the oak in which they are framed contrasts with the dark toned walnut and adds to the salience of the panels.

The legs do not directly support the top of the piece.  The top rests on the panel frames and floats above the legs. (In order to minimize racking a ¼” plywood back is rabbeted and glued into each frame.)  The walnut legs feature an incised, carved detail.  The interior of the incision is outlined in maple.  The maple calls attention to the detail because of its contrasting color and because the technique for “inlaying” the maple inside the carved detail is not immediately obvious[i].  The legs are oriented 450 with respect to the front and side of the table.  This arrangement makes the detail easily visible when viewed from the front, the side or the corner of the piece. 

The stars of the piece are Olena’s quilts.  The artistry is immediately obvious.  The colors are vivid, discrete and beautifully combined.  The masterful stitching adds to the imagery and texture.   There are two quilted panels in the piece and the images seem quite different.  But, look a little closer—Olena has tied them together.   The birds are different, a great egret and a Carolina wren, but the flora is the same!  For example, there is a branch that starts in the upper left corner; crosses to the right and ends in the middle of each panel.   In spring there is a blossom at the end of the branch; by fall, the blossom is gone and the seed pod is revealed!  Same with the flora at the panel bottom:  Green and budding in the spring; dried and yellowing in the fall[ii]


Autumn Flight.  Our second piece was explicitly designed to feature Olena’s quilts.  The woodwork and the fiber art explicitly incorporated a Japanese esthetic and the effort was better integrated.   Hopefully, the completed piece has some interesting architectural details.  And, of course, Olena’s fabulous work jumps right out.    

This table (26” wide X 16” deep X 26” high) is larger than The Gift and qualitatively different.  Again, the top is not directly supported by the legs.  But, instead of straight legs with carved details, these cherry legs follow a sweeping curve; the sides of the table are defined by two simple horizontal battens mortised into the legs.  Viewed from the front, the sweeping legs give the table a feel of opening up toward the sky.  Some of the more subtle details reinforce this opening upward feel.  These include the panel frames that are larger at the top than the bottom, the profile on the side edges of the table top (repeated on the top of the panel frames and even the tops of the legs). 

The quilts, again, steal the show.  Each of the two panels features falling ginkgo leaves, a moth (Luna moth, tiger swallowtail moth) and other fall foliage.  The magic, of course, is in the detail:  The texture of the background, sky and mountains, for example.  The use of metallic like thread for the mountain top snow and background flora animates these details as the light hits from different angles. The stitching that creates the meticulous detail of the veins makes the leaves 3- dimensional and they pop for the eye.  Too, check the detail in the moths including veins, decorations and even feather like antennae.   My favorite detail is the dandelions on the lower left of the tiger moth panel:  We can see the seeds going airborne in the autumn breeze.  The dominant colors in this piece are more subdued than those in The Gift and they nicely complement the wood tones.

Girls Night Out:   The architectural aspects of this piece (15” Depth x 30” Width x 36” Height) are clearly influenced by Autumn Flight.  This time Olena and I agreed on an art deco theme.   Table legs with a simple arc became   legs with a compound curve that might resonate with the sinuous curves often seen in the depiction of women in art deco graphics.  The inverted triangular panel was enlarged and the proportions changed to make the panel look sleeker.  A shelf appears and the side panels feature art deco themed marquetry. 

 The stark contrast provided by the black background in Olena’s quilts adds drama.  Similarly, the contrasting woods provide interest value.  Padauk is a highly saturated reddish/orange color when newly cut and contrasts nicely with the light colored quarter sawn sycamore.  And, the sycamore when viewed closely has a delicate lace pattern to it like some of the gossamer effects in the quilts.  

Again, details in the quilts are noteworthy.  For example, the variable skin tones on the woman’s back are differences in light reflection due to the quilting pattern on a uniformly colored fabric.  There is an impressive gossamer quality to the fur stole, even more so in the “see through” stole and incredibly so in the veils.   

As in all of her quilts variable lighting makes a huge difference and even animates the piece- a quality that is difficult to convey in a still image.  Also difficult to convey are some of the subtler aspects of the work.  For example in the background of each panel there is a group of top hatted, cigar smoking “gentlemen “ “eyeing” the girl.  I love this piece:  The images, colors, contrasts, and uplifting sweep of this piece elevate my mood.   And I have tried to capture that feeling in a short video (click HERE).

The collaboration between Olena and me has gone on longer than expected.    I expected to incorporate Olena’s panel into The Gift and move on.   However, our collaboration was incredibly easy and I wanted more.

Why did I want to continue working with her?  Some of the reasons are obvious and impersonal.   Others are personal:  Growth oriented and egoistic.  Her work is simply first rate.  And, that improves the esthetics of our joint work.  Her work makes my work look better.  I love it when people tell me they like my work.  And, new people were expressing greater interest.  And, for me, like every other artist/craftsperson, self-improvement is a constant issue.  So, collaboration was attractive because one tends to learn more from one’s most accomplished colleagues.  Finally, I am simply proud to work with a person of her talent.

I have profited artistically from this collaboration and I hope that Olena has as well.  We commented on and made suggestions regarding one another’s work but the quilts are unambiguously Olena’s work and the woodwork is unambiguously mine.  After The Gift I simply found myself thinking about forms that might enhance the marriage of textile and wood art; a line of thought I would not have engaged without the collaboration.  And, that line of thought and the pieces that have grown out of it has enriched my artistic vocabulary. 

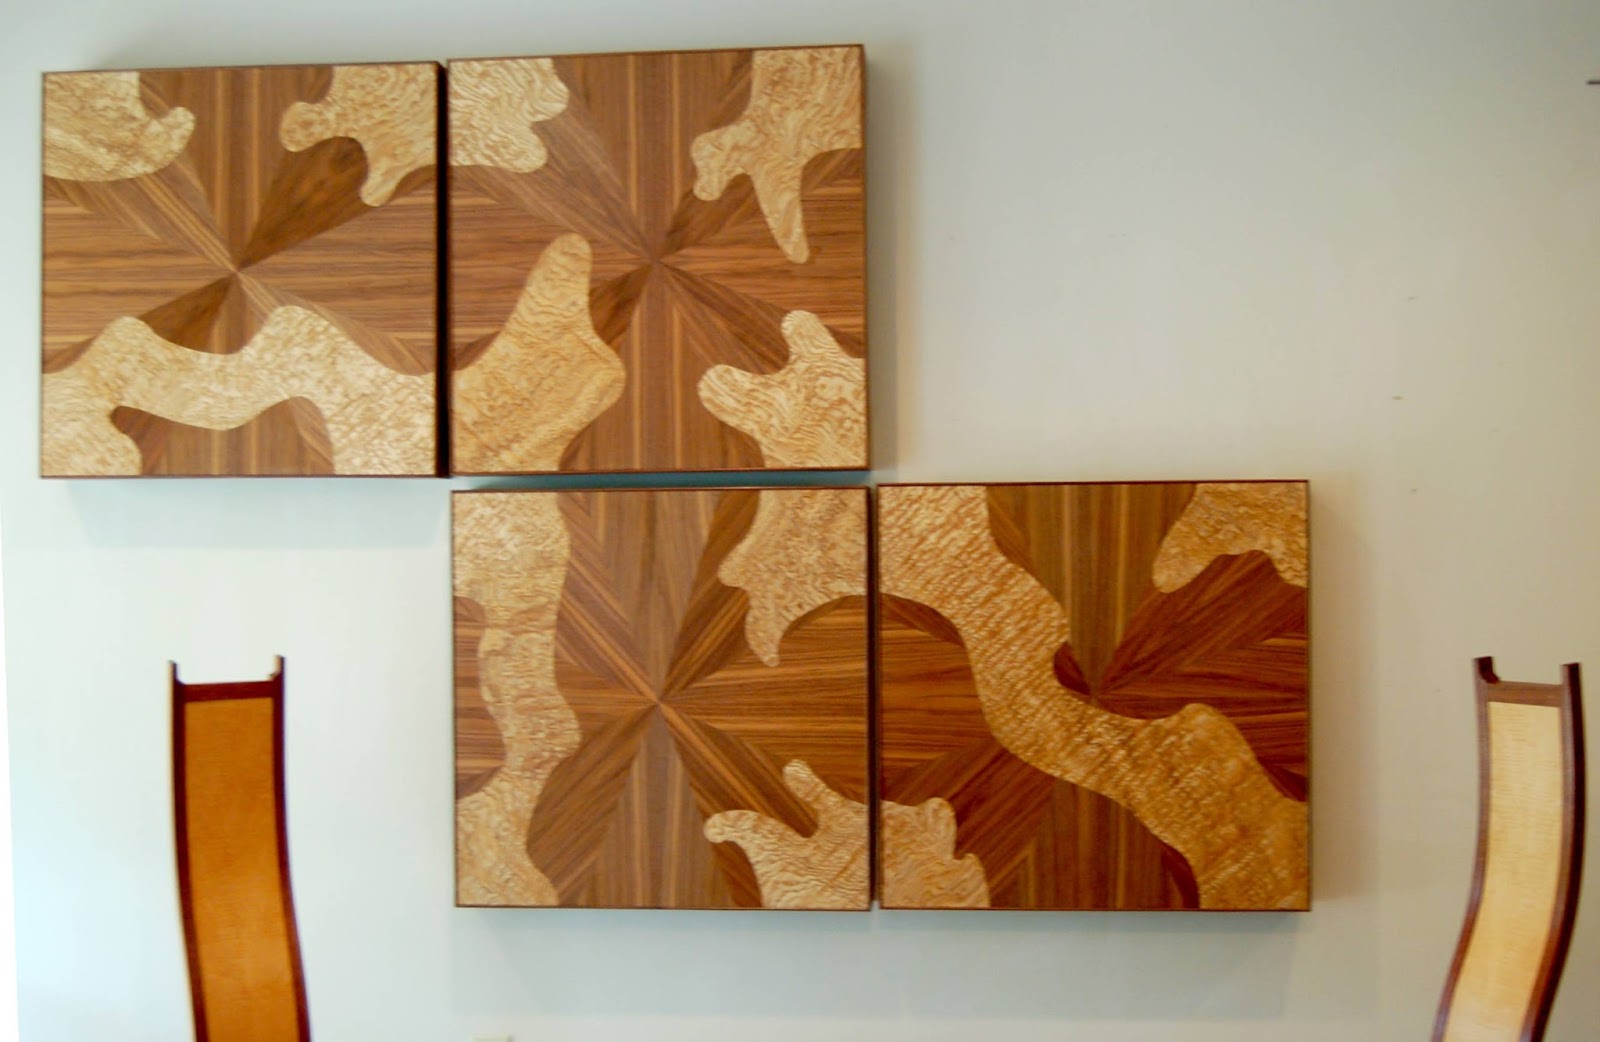
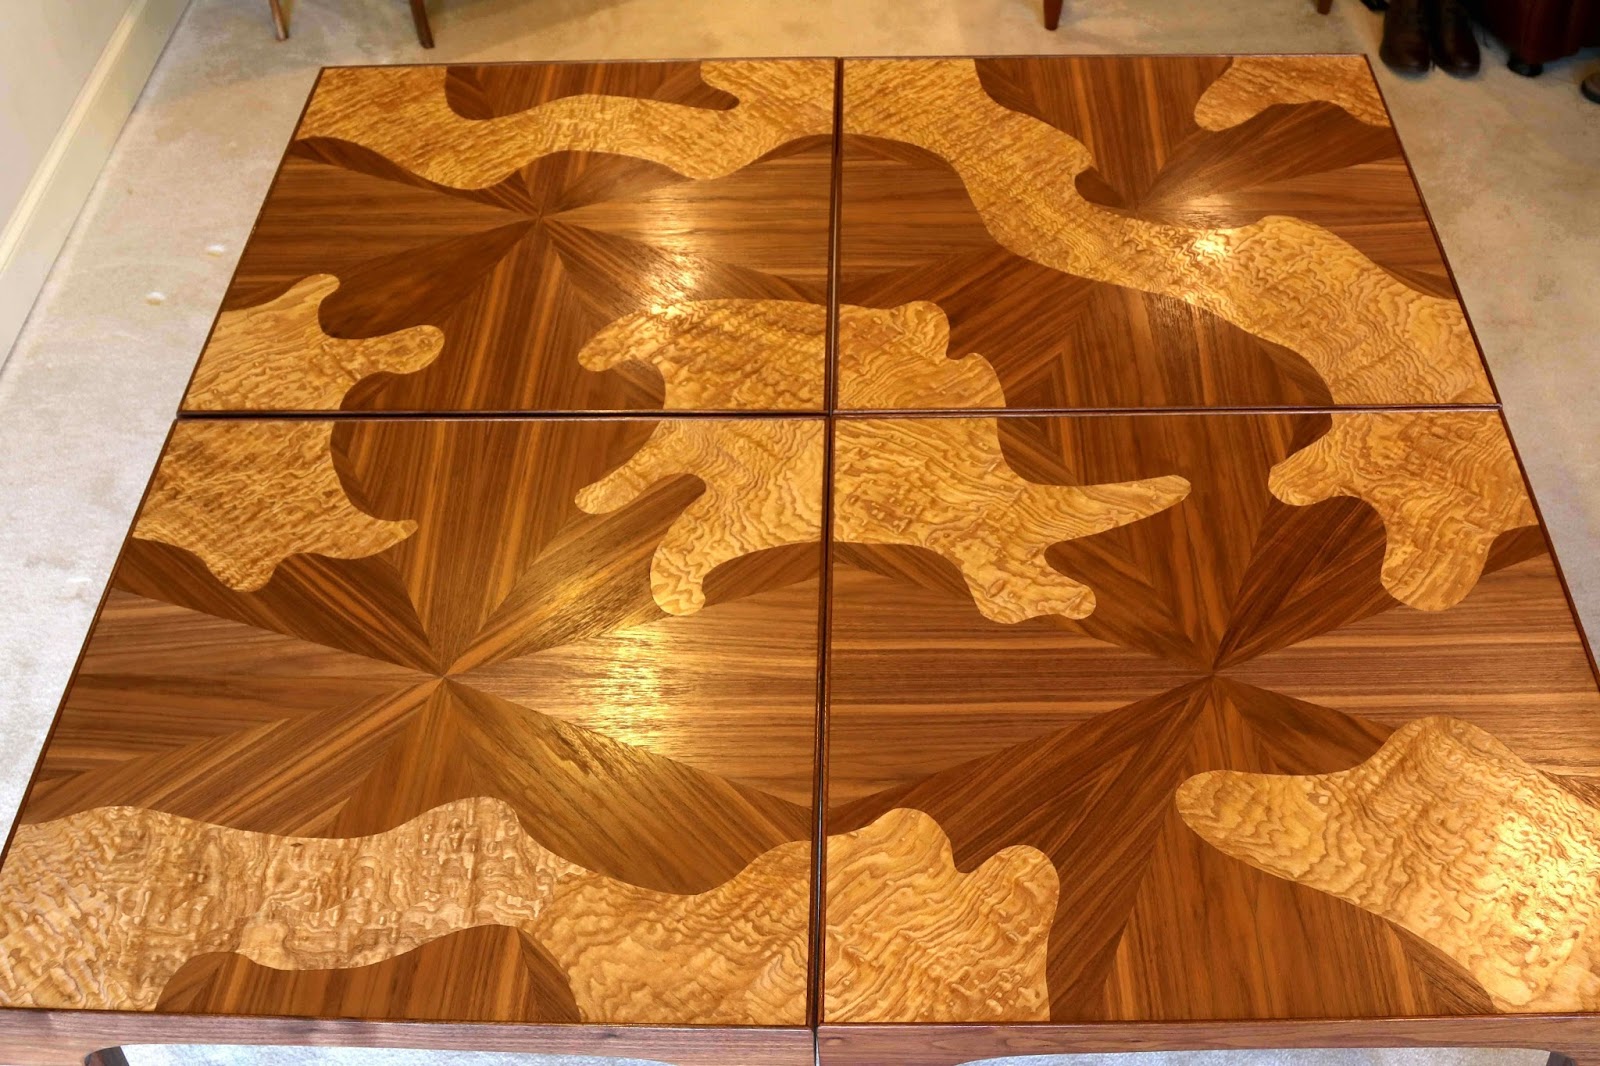
The Gift was a “one off” piece.  There is not another piece like it anywhere in the world.  But, it was a new sentence composed from my extant furniture making vocabulary.   The table form evident in Autumn Flight and Girls Night Out has emerged directly from this collaboration.  The form is new for me and it is a form with which I am continuing to work.  Olena’s work has focused on nature so I was delighted when she agreed to do the art deco ladies.  Perhaps, working on this has helped expand her artistic repertoire as well

This collaboration started with a gift to a friend and has become a greater, more lasting gift to myself.  My work benefitted by combining it with Olena’s.  I had a good time.  I came away with more as an artist/craftsman than I had before I went in.  Did luck play a role in these outcomes?  No doubt.   But, if you have the opportunity to work with someone you admire in another field, it is well worth a try!

******************************************

Abraham Tesser started building furniture as a hobby over 40 years ago.  After retiring from academe, about 20 years ago, he became more serious about designing and building furniture.  His woodworking style reflects his academic background in a several ways.  He thinks long and hard about design and construction issues before creating the first bit of sawdust.  He reads voraciously about design/woodworking/furniture.  And, he enjoys writing and lecturing about these topics.  For more click HERE.


Olena Nebuchadnezzar has a BFA degree from Boychuk Art and Design Institute in Kiev, Ukraine, with an emphasis on graphic arts.  But her love of textiles pushed her to become a self-taught fiber artist.  Her quilts attempt to show human feelings and different stages of life through different seasons in nature, drawing the viewer's attention to the fragile, ever-changing beauty of nature around us and commemorating it.  For more about her work click HERE.


[i]  The detail is neither carved in the usual sense nor is it inlayed.  The detail is turned on a lathe using a technique called “inside out turning”; and the leg blank has a thin maple laminate near the surface.  See  Abraham Tesser. (2019).  A Stylish Stool:  Quick Turn Adds Pizzazz. American Woodturner, October, 2019.  Vol 34, no. 5, 26-30.


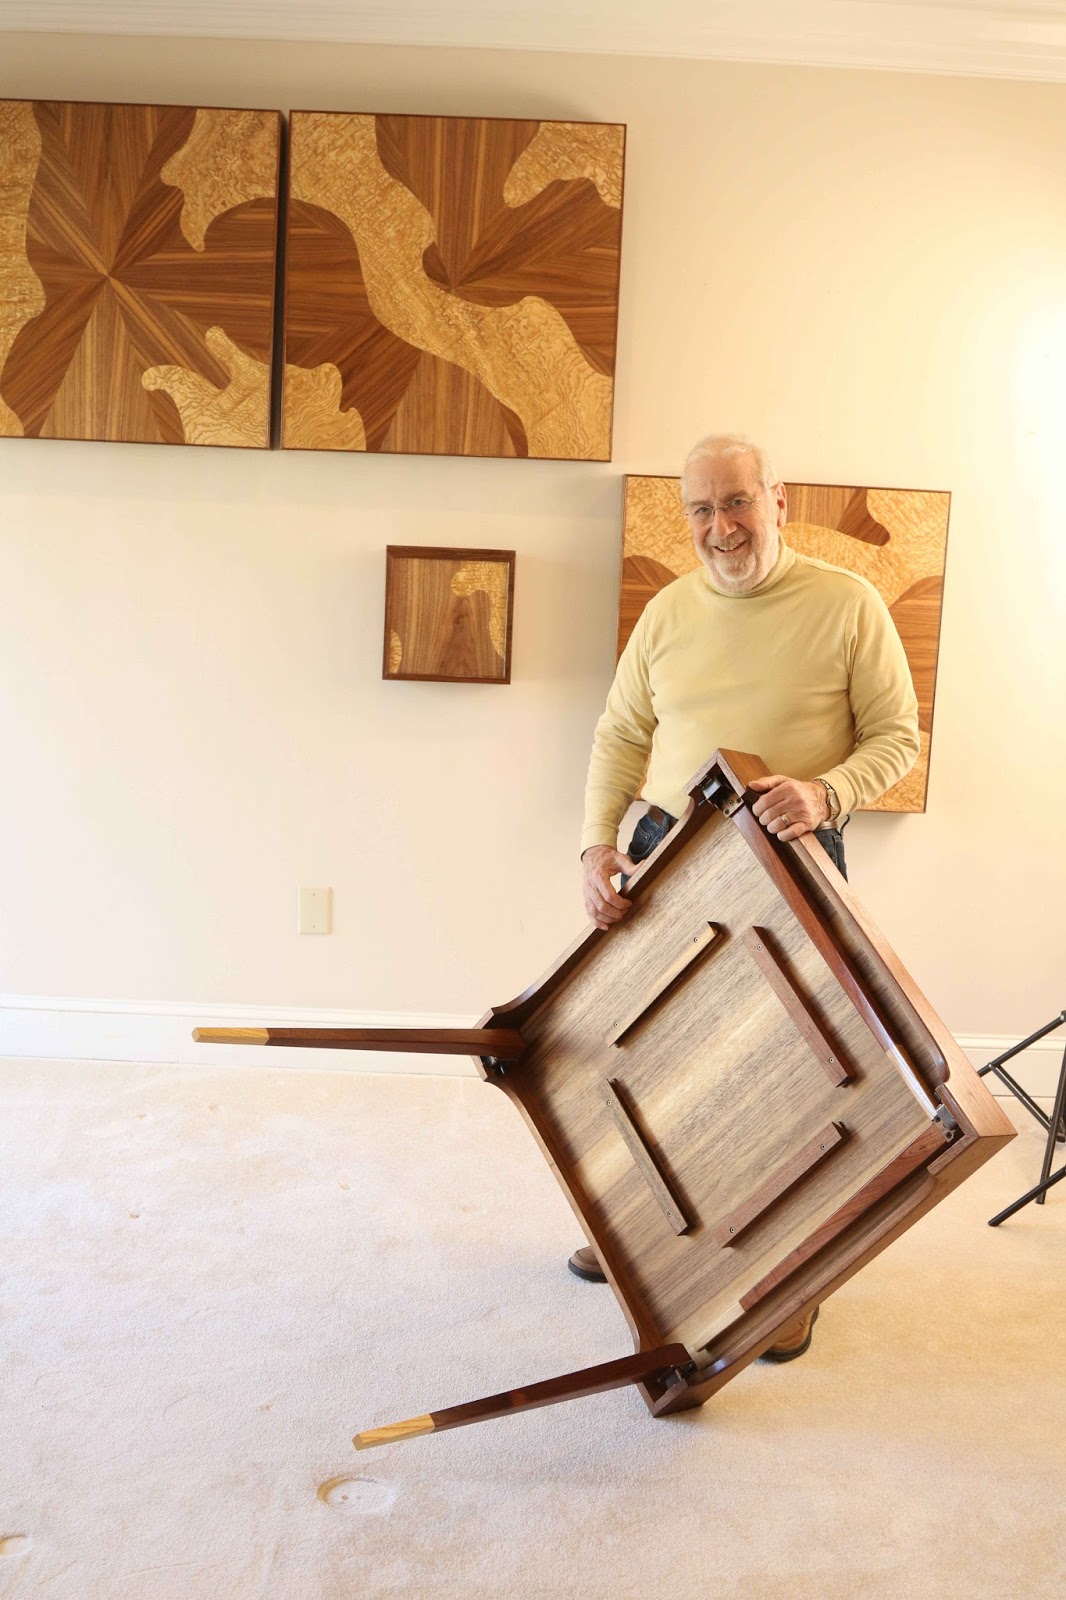
[ii] Gift Epilogue.  When my friend visited the stool/table was under wraps.  I asked her opinion on “something new” and uncovered the piece.   Her eyes immediately locked onto the quilts.  She was clearly taken back by the quality of the work displayed in the panels.  It took a while for it to sink in that Olena, one of her quilting “heroes”, was my collaborator.  She almost lost it when she learned that the piece was for her and her husband (a birder, hence the bird imagery).    She couldn’t imagine sitting on this piece and the stool/table there and then became a table!  I can’t imagine a more appreciative response to this collaboration. 


Monday, May 25, 2020

Visible Works: A Mechanical Cabinet


Visible Works: A Mechanical Cabinet

Ancient Mechanics, Contemporary Controls and a touch of whimsical elegance.


This odyssey starts with Extravagant Inventions: The Princely Furniture of the Roentgens, an 
Exhibit at the Metropolitan Museum of Art (Oct 30, 2012- January 27, 2013).  The Exhibit featured the work of Abraham and David Roentgen, 18th century furniture makers who sold their work to the likes of Marie Antoinette, Catherine the Great and other royal houses of Europe.  Their work is visually stunning.  But it was the “automata” that they incorporated into their work that seduced me.  There are drawers, secret compartments, easels, and game boards that fly open with the push of a button or the twist of a nob.  A good illustration is their Berlin Cabinet.  


I spent too much time studying their work, in particular, the mechanisms they used.  The Roentgens
made it hard on me.  They hid their mechanisms.  I decided to make a piece in which the mechanics would be quite visible; indeed, the mechanism would be the featured element of the piece.  The work of the Roentgens was elegant, elaborate and complex.  Lacking their talent and resources, I decided to go for elegant but simple.  The motive power for the Roentgens was springs and weights I decided on a small electric motor controlled by a microprocessor.

I had little background for what I wanted to do so there was a lot of learning and many new kinds of technical and design decisions.  There are a number of ways to convert circular motor power to the linear action needed to control a drawer. I decided on involute gears and a rack.  This led to an extended detour to learn about the geometry of gears (involute gears have complex shaped teeth) and how best to fabricate them in wood.  (The easiest and most reliable method for cutting these intricate gears, that I found, is on the table saw!) 

I also began playing with and learning how to program and use a small (2 3/4” X 2 1/8”) microprocessor, an Arduino.  The microprocessor mediates between the user’s signal to open or close the drawer at a particular speed and the direction and speed of the motor.  A ship’s old fashioned Engine Order Telegraph (chadburn) serves as the inspiration for the user control and a small potentiometer is hidden therein. The Arduino also controls LEDs and responds to switches indicating when the drawer is fully extended or closed by turning off the motor.  Everything is powered by a 9 volt battery. 

A variety of esthetic design decisions loomed throughout.  I decided on a single drawer on curved legs (bent laminations).   Mechanical visibility was paramount so the gears reside on the top of the cabinet as does the controller and the motor housing.  Power from the motor is transmitted to the gears by a visible leather belt; the belt tension is adjusted via a visible wooden screw.  The sides of the cabinet are open and all but the back of the drawer is visible as the drawer opens and closes; the adjustable rack is fully visible on one drawer side.  To further enhance visibility I used contrasting woods:  The cabinet and legs are dark (walnut) and the mechanical components are light (olive ash burl veneer).  The piece that emerged has a kind of “Hugo Cabret” sensibility.

The need to hide some components raised additional design questions.  As much as I wanted to draw attention to the mechanical aspects of the piece I also wanted to hide the electronic substrate.  The electric motor and the potentiometer (to control speed and direction) are hidden in small cabinets.  To make these components accessible the cabinets are held down with rare earth magnets.  The Arduino, a circuit Board and the battery are hidden in a small box fixed to the underside of the top.  (The back of the drawer is placed sufficiently back from the end to of the drawer to allow the drawer sides to hide the box when the drawer is closed.)  The wires are hidden in channels cut into the underside of the top.  There are 4 hand tightened screws holding the top to the cabinet.  Thus everything under the top is accessible by removing the screws. 

This piece is a far cry from the work of the Roentgens.  It is not nearly as grand in scale, as sophisticated in workmanship and design or as opulent.  Perhaps, however, it has some visual grace.  And, if you like to know how things work, you may even find a bit of charm in this whimsical display.

(Click HERE to see a video showing the piece coming together and doing its thing!)

Wood:  Walnut, curly maple, olive ash burl veneer

Other materials:  Leather belt; electronic components including, Arduino computer, potentiometer, electric motor, switches, LEDs; metal fittings such as sleeve bearings, axles, hubs.

Finish: Wipe on Poli over shellac.

Dimensions: (Depth x Width x Height): 171/2” x 141/2” x 40”


Friday, April 29, 2016

Versatile Hanging Tables


Click HERE for a one  minute Demonstration of the versatility of these tables.


These hanging tables are beautiful and practical.  They create an arresting focal point on the wall.  The light colored, tamo ash veneer appears to flow smoothly across table boundaries creating a beautiful, organic overall graphic design (OGD).  A closer look at this material shows highly variegated grain patterns that capture the oft found complexity in living systems.   The linear grain pattern of the darker, walnut background also flows smoothly across tables providing a warm, patterned mosaic background across tables. 

And these pieces are practical.  Each of the four 31.5” X 31.5” hanging pieces is actually a functional table, height 28.5”.  Each can be removed from the wall and the hidden legs unfolded.  When a table is removed from the wall its hanger serves as an attractive place holder.  Any single table can function as a card table seating 4.  But they can also be set up, one right next to another, in various configurations allowing for a variety of seating configurations when needed, and no loss of valuable floor space when not needed. 

Why did I build these tables?  I was seduced by the potential design possibilities:  The number of potential OGDs in these tables is astonishing, well over 100,000[1]!  

From whence the versatility. With respect to individual table top graphicso no two tables are alike nor is there bilateral symmetry.. So, any rearrangement of tables or any rotation of tables produces new OGDs.  The key is getting the figure and background to appear to flow across tables.  This requires, that the boundaries of the images(s) at the edge of Table A match the boundaries of the images at the contiguous edge of Table B.  This was met by constraining the graphic design of each table top to have figural elements in every corner.  The boundaries of these elements where they cross table edges are exactly the same distance from each corner of the table, 7.75” or 25% of the length of a side.   With this set of constraints, regardless of table selection or rotation the boundaries of the figural elements match up across contiguous pieces.

There must also be continuity in the background and foreground materials across tables, i.e., no jarring change in grain direction or discontinuity of figure in the wood where the tables meet.  To deal with this, the background veneer was configured in a sunburst pattern, i.e., the grain appears to fan out from a point in the center of each table.  Since the walnut grain pattern on each table side is identical within and across tables, there is a background match regardless of specific table or rotation.
The tamo ash figure also seems to flow nicely across table boundaries/rotations.  The color of the tamo ash is a striking contrast to the walnut background.  Thus, the eye tends to see contiguous tamo elements as belonging together.   Also, although the shapes on each table top are unique they are all abstract, organic, curvilinear shapes that are “plausible” continuations of one another.  Further, the large number of complex and irregular changes in grain direction and figure in this wood make it more difficult for the eye to distinguish changes in grain/wood pattern across tables. 

The hanging system.  A system of “French cleats[2]” was devised to make the tables secure while on the wall but simple to take down and put back.  Four cleats in a square pattern were mounted on the underside of each table so that regardless of the rotation of the table there is a cleat in position to slip over wall cleat.  The cleat to receive the table is mounted at the top, front of a cabinet-like structure mounted on the wall.  (The skirting around each table holds the underside of the table away from the wall. The depth of the cabinet structure precisely compensates for this offset.)  Since these “hangers” are visible when the tables are down for use they were made of the same materials and followed the motif of the tables.  
A summing up.  These pieces are versatile.  They are at once décor and functional tables.  And, by storing conveniently on a wall when not in use, they optimize the use of space.  But even when space is not a pressing issue, one can appreciate the beautiful earthy colors, grainy textures, and varieties of figure reflected in these hanging tables.  And, they are designed to provide for a virtual kaleidoscope of interesting, organic, overall graphic designs on or off the wall.


[1] There are 23 unique geographic configurations of the 4 tables.  For each configuration there are 24 permutations of tables and each table can be in one of 4 rotational positions.  In sum, using all four tables there 23 (configurations) X 24 (permutations per configuration) X 4 X 4 X 4 X 4 (rotational positions of the 4 tables) yielding 141,312 potential overall graphic designs (OGDs)!  (Mitch Rothstein, Professor of mathematics, University of Georgia, personal communication, April 11, 2016.)

[2] A French cleat is a strip of molding with a 45 angle on one edge.  A table is securely hung when a cleat mounted to the underside of the table top slips onto a mating cleat mounted on the wall.  A table is simply removed by lifting it off the wall mounted cleat.

Monday, November 10, 2014

The Sector: 500 Years Old and Still Useful


The Sector: 500 Years Old and Still Useful

Galileo
Proportioning and accurate layout are central to design and building.  The Sector, almost overnight, has become one of my favorite tools for these tasks.  It is a simple device consisting of two legs attached at one end by a hinge.   There is one scale on each leg and they are identical to one another.  (For other purposes, sectors may have multiple scales. See Note 1.)

The sector was invented by Galileo (and a few other mathematicians) in the late 1500’s as a kind of analog calculator (see Note 1).  In the shop, however, it provides a wonderful way to accurately proportion and divide parts without the use of rulers or calculators or formulae.  In my hands, rulers are not foolproof: Mistakes occur from not lining up the end perfectly, not seeing appropriate divisions or misreading the division, or errors in marking.  I am also prone to miscalculation:  I sometimes make mistakes in arithmetic but rescaling is especially annoying, i.e., converting measures in decimal to fractional equivalents or from English to metric or vice versa.  The sector eliminates many of these sources of error.  All one needs is a pair of dividers and the sector. 

 
Below is the first sector I built. It consists of 2 pieces of wood about 24” long joined at one end with a butt hinge.  Starting at the center of the hinge pin, there are 13 equal segments numbered from 1 to 13 down each leg. The units of the scale are arbitrary but they must be equally spaced, a task that is made simple with a pair of dividers.  Its construction was not difficult, didn’t take very long and required only some lumber scraps and a butt hinge.  Believe it or not, it is a fairly accurate instrument!  And, it takes nothing more than a pair of dividers to build in and to capture that accuracy. (See Note 2 for sources of construction instruction.)

Sector with two similar triangles. 
How the Sector works in theory.  The sector works on a simple principle of Euclidian geometry.   Even if they differ in size, two triangles are similar if they have the same angles.  The nice thing about similar triangles is that the ratio of the sides is identical, i.e., the ratio of side a to side b (or a to c, or b to c) in triangle 1 is the same as the ratio of side a to side b (or a to c, or b to c) in triangle 2.  Let’s see how this plays itself out with the sector.  ABC is one triangle and ADE is another (see photo). ABC and ADE are similar triangles, i.e., all the corresponding angles are identical. We know the length of two sides of each triangle.  Two sides in ABC are 6 units and two sides in ADE are 12 units.  We do not know the length of line BC or the length of line DE.  However, because the triangles are similar we know that the ratio of the length of line AB to line BC is equal to the ratio of the length of line AD to the line DE.  And since line AB (6 units) is ½ the length of line AD (12 units) then the line BC must be exactly half the length of the line DE.   If line BC cut the sector at 4 units on each leg, instead of 6 units as pictured, then AB would be 1/3 of the line AD;  so, the line BC would be 1/3 length DE.  (By the same reasoning, since line AD (12 units) is 3 times the length of line AB (4 units) if follows that line DE is 3 times the length of Line AB.)  In short, we need not have a ruler measured edge length to find its center or several other whole number fractions (or multiples) of its length.  These geometric relationships are very useful in the studio/shop.

Some practical examples.  Let’s suppose that the piece of plywood in the illustration below is intended as a drawer front and we wish to put a pull in the middle of that drawer front.  One can of course, measure the width of the front divide by two and measure to the middle.  It can be done more simply by setting the sector to the width of the drawer at any even number on the sector scale.   In the illustration below I have set the width of the drawer front to the number 12.  To get half that distance all I have to do is set the divider to 6 and transfer that setting to the panel.
Set drawer front to 12 on both legs.
Use divider to mark center of panel

Divider set to 6.

 Again, any even number can be used.  If the sector touches the drawer front width at 10 on each leg then setting the divider to 5 will give half the distance.  If the drawer front width is at 8 on the sector legs then the dividers set at 4 will yield half the distance.   My sector put me within less than a hair’s breadth of the middle. And since the distance is laid off with dividers, a tiny depression is left to mark the spot; the depression provides a positive stop for a pencil and square.  Note that I never used a ruler to get the precise width of the drawer front and it is not necessary for me to know that measurement.

 Now, suppose I still want to place the pull in the middle of the width but a bit higher than the middle with respect to the height of the drawer front.  In many iconic pieces, the pull is set at 4/7 of the height.  I can use a ruler to measure the height of the drawer front, divide by 7 and multiply by 4 to give me the distance from the bottom.  However, with the sector all I have to do is set the height of the drawer front to 7 and then set my dividers to 4.  The distance between the legs of the dividers will give me the distance I need. Now, with one leg of the divider at the bottom of the drawer front, the other leg marks the place for the pull at exactly 4/7 up from the bottom. 
Mark 4/7 of height

Set height of panel to 7 on both legs
Set dividers to 4


Now let us consider 2 pulls on the drawer.  Let’s space the pulls an equal distance from each side edge of the drawer front.  Further, let’s set the space between the pulls to be 3 times the space each pull is from its respective side.  Of course, if there is 1 unit of space from the left edge to the first pull, and 3 units of space between the first and second pull, and 1 unit of space from the second pull to the right edge then there is a total of 5 spaces.  Laying out the appropriate distances is quick and easy.  I simply set the width of the sector to 10 across the width of the drawer front; and, then set the dividers to 2 on the sector.  (Two is one fifth of ten.  I could have set the sector to 5 across the width of the drawer and set my dividers to 1 across the sector with exactly the same result.)  Now use the dividers to step off one unit from each edge and the pulls will be spaced precisely as specified: Each pull is one unit from the side and there are three units between them!
            
Thirteen divisions and the Golden Ratio.  It is easy to see why there are at 12 divisions on the sector legs.  Twelve is an even multiple of 1, 2, 3, 4, and 6.  So, with 12 division one can easily find 1/12, 1/6, 1/4, 1/3, ½.   But, why 13?  Thirteen is only divisible by 1 and by itself so finding nice “round” divisions is not facilitated.  But, having 13 units is crucial to classic design proportioning through the golden ratio, 1.618 to 1.

As you probably know this ratio turns up in many design classics, in biology including various human proportions and in the unfolding of many botanical phenomena such as sunflowers.  The golden ratio is based on an arithmetic series known as the Fibonacci series.  Each number in the Fibonacci series is found by summing the preceding two numbers.   Starting with 0, 1, here is what a short series looks like: 0, 1, 1, 2, 3, 5, 8, 13, 21...  The 3rd number in the series was found by summing the first two, 0+1=1; the 4th number in the series is 1+1=2; the 5th is 2+1=3; the 6th is 3+2=5; then 5+3=8; 8+5=13 and so on. As the series progresses the ratio of each number in the series to the next smaller number converges on the Golden Ratio.  Happily, the convergence is relatively rapid and the ratio of 13 to 8 is a close approximation (less than 1/100th of a unit) to the Golden ratio.

Use the sector to lay out a golden rectangle.  Mark or set the width of rectangle to anything you wish.  Capture that width with the sector at scale value 13 on each leg.  Maintain that setting on the sector and set your dividers to 8 on each leg of the sector.   Use the dividers set at 8 to mark the height of the rectangle.  The ratio of 13 to 8 approximates a golden rectangle, i.e., 1 to 1.62.  in short,  including 13 divisions on the sector facilitates the use of the golden ratio.
          
It is easy to see why the sector is a welcome addition to my shop.  It makes life a lot easier for designing, proportioning and dividing.  Will it replace a ruler and computation?  No.  The smallest division of the sector is 1/13th of a unit and we often need smaller units.  And, we often need fractions that are not immediately available using the sector. However, the sector is convenient and useful for laying out proportions that are possible with the limited scale that it has.  Fortunately, from a design perspective, that leaves a lot (see note 3).  Since the time of Pythagoras, many design schemes utilize a harmonic approach.  Just as consonant musical harmonies in which whole number ratios such as 1/3, ¼, 1/5 produce attractive sounds the history of design shows that spatial proportions using such whole number ratios also produce attractive visual elements.  In addition, the golden ratio, 13/8, also available on the Sector, is particularly useful for slicing and dicing space.

Notes
1.     To learn more about the sector as a scientific instrument see The Sector: its history, scales, and uses, by Erwin Tomash and Micheal R. Williams.  Click here for the PDF.
2.    Want to build your own sector?  The sector shown in this article is based on instructions given by Jim Tolpin and slightly modified by me (click here)Other instructions are given by Chris Schwartz.
3.     I was introduced to the sector by a book titled By Hand & Eye  by George Walker and Jim Tolpin, (Lost art Press, Fort Mitchell, 2013).    The book is about methods for designing, proportioning and laying out furniture.  It does a good job of increasing our awareness of the importance and ubiquity of proportioning schemes in well-designed furniture.  One of the most useful tidbits that I got from the book is its introduction to the sector.